How to Trade a CLS Model 1 Setup on GBPUSD
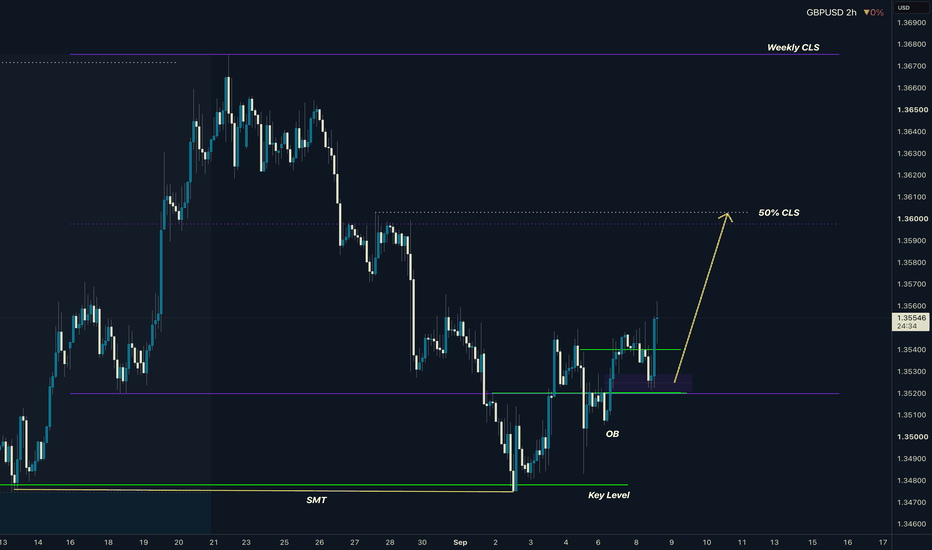
A Practical Guide to the CLS Model 1
My recent analysis of a GBPUSD long setup highlighted a classic CLS Model 1 pattern. While understanding the theory is important, the real value comes from knowing how to apply it practically. How would a trader, step-by-step, approach this kind of structure?
This guide will walk you through the process, turning a chart idea into a concrete, actionable trading plan. This is the kind of practical application we focus on daily in my live trading sessions, providing the hands-on experience needed to learn forex trading effectively.
Disclaimer: This is for educational purposes and not financial advice. Always manage your risk.
Step 1: Identify the CLS Range
Your first task is to become a pattern recognizer. The CLS Model 1 begins with a "CLS Range." Look for a clear period of consolidation on your chart (in this case, the 2-hour timeframe).
- What to look for: A series of candles moving sideways, establishing a relatively clean support level (range low) and resistance level (range high).
- Action: Draw horizontal lines at the high and low of this range. This visually defines your trading environment. This range is now your primary point of reference.
Step 2: Anticipate and Observe the Manipulation
With the range defined, you now play the waiting game. The hallmark of this model is a price move below the range low. This is the manipulation phase.
- What to look for: Price breaking the support level you just drew. Crucially, you are looking for it to dip into a significant "Key Level" below the range—this could be a previous low, an order block, or another area of technical importance.
- Action: Do nothing. This is a critical point. Do not sell the breakout, and do not immediately buy the dip. Your job is to observe. Does price slice through the key level with momentum, or does it stall and show signs of rejection (e.g., long wicks at the bottom)? As a forex mentor, I can't stress this enough: patience here is paramount.
Step 3: Wait for the Confirmation (CIOD)
This is your trigger, the green light for the setup. After price has dipped below the low and reacted at a key level, you need to see a clear Change in Order Flow (CIOD).
- What to look for: A strong bullish candle that closes decisively back inside the CLS Range you defined in Step 1. This candle signifies that the sellers who pushed the price down have been overpowered, and buyers are now in control.
- Action: Wait for the candle to fully close. A common mistake is entering while the candle is still forming. The final closing price is the only confirmation that matters. This single rule can drastically improve a trader's discipline and is a cornerstone of any good trading course.
Step 4: Execute and Manage the Trade
Once you have your confirmation candle, you have all the information needed to structure a trade.
- Entry: Enter a long position at the open of the next candle after your confirmation candle has closed.
- Stop Loss: Place your stop loss below the low of the manipulation move (the wick that dipped into the key level). This defines your exact risk on the trade.
- Target: Your primary target is the 50% level of the CLS Range. You can draw a Fibonacci retracement tool from the range high to the range low to easily find this midpoint.
By following these steps, you create a trade with a defined risk and a logical target. This systematic approach is essential for any aspiring funded trader who needs to demonstrate consistent, process-driven results. It's not about being right every time; it's about having a sound plan and executing it flawlessly.
WRITTEN BY
David Perk
Full-time forex trader and mentor. $1M+ verified track record on FX Blue. Teaches the CLS strategy to funded traders — live, five times a week.
Want to trade this alongside David?
Join the community — livestreams 5× a week, trade breakdowns, and entries called in real time. Your first week is free, full access to every paid feature.
Join the community — first week freeNo experience needed. Cancel anytime.